
Astrometry
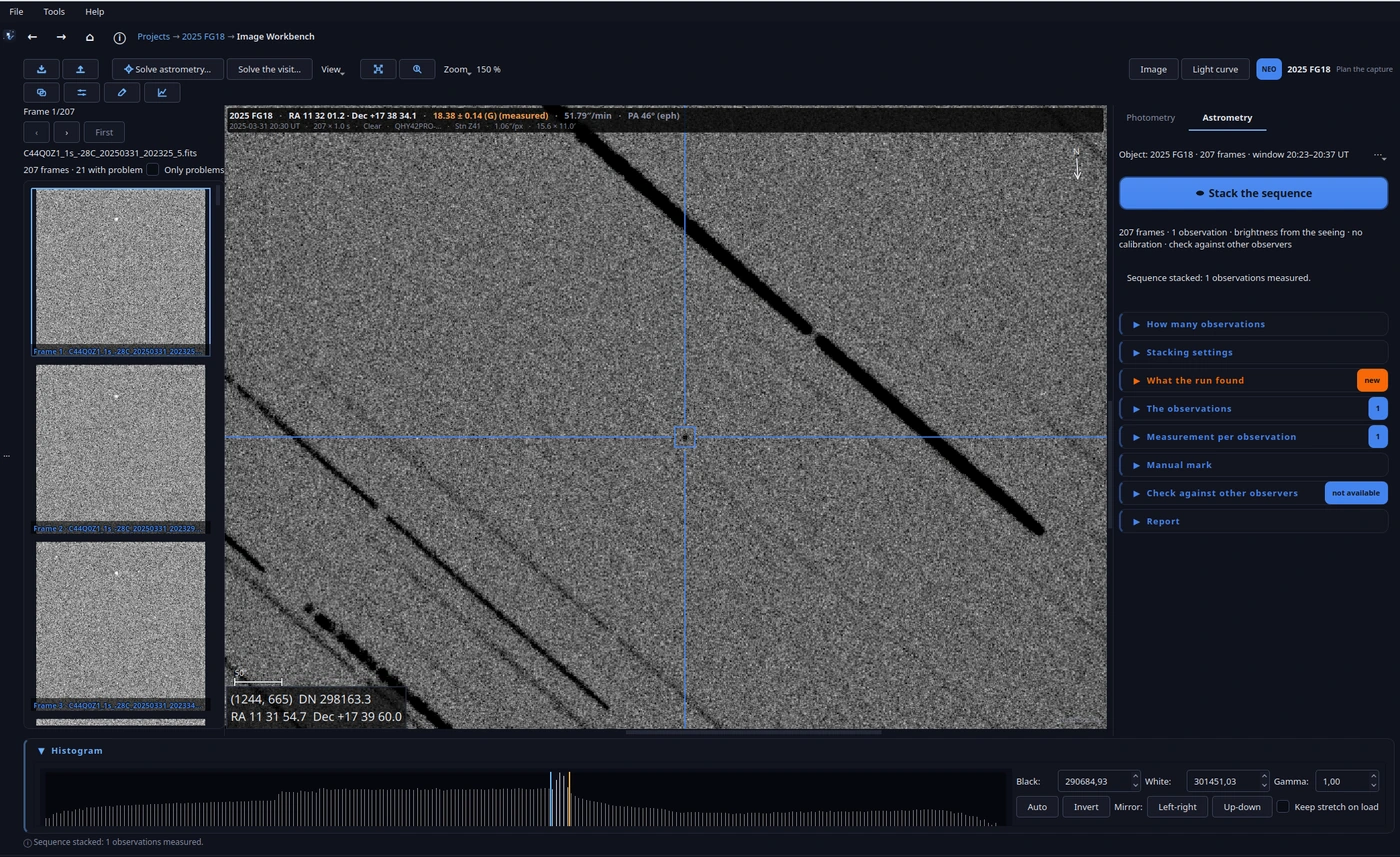
Minor-body astrometry (asteroids, NEOs, comets) lives in the Astrometry tab of the FITS editor, and its engine is track & stack: stacking your frames following the object's motion, not the stars'.
First of all: solving the plate
Everything astrometric needs a plate solution (the WCS: which point of the sky each pixel is). Under Settings → Measurement → Plate solver you choose:
Auto (recommended): tries local ASTAP first (fast, offline, free) and falls back to nova.astrometry.net if you do not have it or it fails.
ASTAP only, or nova only, if you prefer.
With Save the solved WCS into the FITS header (on by default), the solution is written into the FITS header (pixels are never touched) and any other program will see it.
Why ASTAP first? Because it solves in seconds on your machine, with no uploads and no dependence on someone else's queue. Nova is the fallback: slower and API-key based, but truly blind (it does not need to know where you were pointing). The combination covers 99% of cases without you having to decide.
The track & stack
Stack the sequence runs the whole pipeline: solves the reference, registers the frames against each other, sweeps the object's velocity (fetched from Horizons when the run starts), detects, stacks each observation, measures and checks. While it runs, the same button is Cancel.
The key decision is Observations: into how many observations (measurement points) you split the sequence. Each observation is a contiguous group of frames with its own middle-of-exposure instant (T_mid).
Why does the number of observations matter? Because SNR grows with the square root of the frames: asking for more observations splits the signal and each one reaches less far. Next to the selector you will see the SNR each observation is expected to reach with the current split. Three solid observations are worth more to the MPC than six weak ones; the practical rule is: just enough to see the motion, no more.
Why T_mid and not the exposure start? Because the object's position during the exposure is the mean of its travel, and its best estimator is the central instant. Reporting the start introduces a half-exposure bias, which on a fast NEO (5″/min) means tens of arcseconds of systematic error. The MPC expects T_mid; NightScribe computes it for you.
What the run does, step by step
The progress bar names these same stages, in this order:
Calibration (optional): resolves the recipe against the master library and applies it to each frame as it is read, in memory. No calibrated copies are written to disk. If the library has no flat for the filter, a vignetting model is built from the frames themselves and stands in for it.
Solve: gets the reference frame's WCS (ASTAP, with nova as the fallback), or reuses the one the FITS already carries.
Registration: every frame votes the transform that puts it back on the reference grid, translation first and rotation only when translation is not enough. Each frame's sky noise is measured here (it is the weight of the weighted method), and the dithering and the "two runs" checks are done.
Ephemeris: the object's position and rate over the visit, from Horizons and, if it does not answer, from the orbital elements propagated locally and then from NEOfixer. Each frame gets its predicted position and its T_mid.
Base stack and detection: the whole sequence is stacked with the object frozen, and the detection gate asks whether there is something there. It does not throw the run away: below the gate the run still measures, says so and paints the magnitude red.
Velocity sweep: a small grid around the ephemeris' rate (about ±5 %) is scored by SNR and roundness, seeded by the object's own trail. A candidate is adopted only if it beats the ephemeris by more than the grid's scatter.
WCS quality control: the composed WCS is checked against a direct solve of the frames, so a drifting grid is caught before it reaches the report.
One stack per observation: the sequence is split into the observations you asked for and each group is stacked at the position of its own instant.
Measurement, twice: each observation is measured on its stack and frame by frame with the same centroid. A disagreement beyond 0.5″ or 3σ is flagged, never resolved silently.
Brightness (optional): measured on the object's stack, with the comparison stars on a second stack aligned on the stars.
Check (optional): your points are compared with the object's published observations through Find_Orb.
Every stage that touches pixels reads through the same calibration, so what the detection sees and what the brightness is measured on are the same frames. A frame that NightScribe already calibrated (an exported copy) is not calibrated a second time: it carries the marker and the run says so.
The stack options, and their motivation
Method (how the frames are combined): the sigma-clipped mean is the default because it reaches about a quarter of a magnitude deeper than the median (a median is 1.25 times noisier than a mean) and, unlike the plain mean, it rejects satellite trails and cosmic rays. Weighted is the same clip with each frame weighed by its own sky noise: on a stable night it changes nothing, and it is what saves a night with thin cloud or Moon. Use the median only when something must be rejected outright and the clip cannot.
Resampling: bilinear (default) gives a visibly cleaner image at no cost in depth (measured by source injection, not assumed). Cubic keeps a marginally sharper PSF with a grainier image: use it if you are chasing detail in a crowded field. Beware: a smoother image is not a deeper one; depth is decided by the method above and the frames that go in.
Field: how much sky each observation's final stack covers. The whole frame keeps the comparison stars around; a smaller window is faster and lighter. The velocity sweep always works on the object's own trail cutout, whatever this says.
Apply the calibration: applies the Calibration tab's recipe to each frame as it is read. Without it, the optical train's dust and vignetting leak into the stack and, since the object and the comparisons do not sit in the same place, the smooth vignetting alone is worth a systematic error of a tenth of a magnitude in the brightness. The recipe is resolved against the library in Settings, and the Calibration tab tells you which master it uses for each piece and why it is not using one you can see in the library (a temperature out of tolerance, another exposure, another filter or camera, or a flat much older than the lights). A flat is used whatever the sensor temperature it was taken at: its shape is the optical train's, not the sensor's.
Measure the brightness and Keep the star stack: the magnitude is measured on the object's stack and on a second stack aligned on the stars (on the object's stack they are streaks). Without comparisons in the field, the run reports positions only and says so.
On a graphics card
The two heaviest stages of a track & stack can run on your graphics card instead of on the processor: the registration (finding where every frame sits and which stars it holds) and the stacking (deforming every frame onto the reference and combining them). It is on by default, it does not change what is measured, and a machine with no card runs on the processor as always.
Chapter 12 has the whole story: what it accelerates, the Backend selector (OpenCL by default, CUDA installed by hand) and how to turn it off.
Reading the result
The panel shows what the run found: the session's dithering, the composed WCS quality, the velocity sweep, the detection and the brightness. Each observation is measured twice with the same centroid recipe: on the stack and frame by frame. A disagreement beyond 0.5″ or 3σ is flagged; it is never resolved silently.
The Re-measure button re-runs the recipe on the saved stacks of the run's observations (each object's and its star's) without re-stacking the visit, and rewrites only the stacks' bands: the positions and the detection are untouched. It needs the run to have kept the star stack. When a track & stack is open, the project's own object mark is switched off: the stack already carries the run's measured position, and two marks (at the plan's coordinates and at the measured ones) read as an error.
The object's own trail on the whole-sequence stack also helps: its length and direction give two candidate motions that seed the velocity sweep, so a motion the ephemeris got slightly wrong can be found from the object's own light. The sweep still decides, with the same guard as always: it only adopts a candidate that beats the ephemeris by more than the grid's scatter.
Animate / verify plays the observation stacks centred on the object with one shared stretch: the object must stay put in the middle while the stars crawl. That is the acid test that the detection is real. Save animation… writes that very loop as a GIF or an MP4, with the levels you applied and the plate's heading on every frame, so the proof can be shared. Blink / montage… writes the figure (GIF or montage) with the same stretch on every panel, so a faint one does not look as bright as a real one.
If the object is below the detection gate, Manual mode (faint object)… lets you mark it by hand on the whole-sequence stack: the position is yours (snapped to the centroid, nudgeable in 0.1 px steps) and the velocity is the ephemeris', with no sweep.
The check against the published data
After the run, NightScribe compares your points with the object's already published observations (the MPC API, or the NEOCP if not yet confirmed) and gives a verdict: whether your point fits or stands out. It also shows you the whole list: every published observation Find_Orb used, with the instant, the station, the direction and its residual in right ascension and declination (dRA / dDec), and your own rows highlighted. That is your error next to everyone else's, the way Find_Orb and Tycho-Tracker show it. The list lives in its own non-modal window: the check block is a narrow column, so it is opened with the Published observations… button and stays open beside your work.
Why "the check filters, it does not prove"? Because fitting a short arc does not prove a detection: it proves you do not contradict it. The check exists to catch mistakes (a misidentified object, a wrongly solved scale), not to certify reality. If your point stands out, the report is blocked by default; Force the report forces it while leaving the fact on record in the report's own note.
When the check cannot run it says why, in plain words, and never pretends: no Find_Orb configured, no published observations yet, or a reference arc too short for Find_Orb to fit an orbit. None of those blocks the report.
Check against sets the designation the check asks the MPC for, and Re-check repeats the check on the points already measured, without stacking the frames again.
A residual looks wrong: fix the centroid by hand
When a point stands out against the others, the usual cause is the centroid: a bright neighbour dragged it, or the object sat on a bad pixel. Right-click an observation (in the points table, or on the image) and choose Adjust the centroid…: its stack comes on the editor's own stage, so you zoom, stretch and read the histogram with the controls you already know; click the object and the mark snaps to its local centroid. The point is re-measured on the saved stack, with no re-stacking, the check runs again on its own and you see the new error at once. The point is signed ("centroid re-selected by hand"), and the app says what it fixes: the centroid, not a bad registration (for that, re-stack the run). It is the per-observation tool: it re-measures ONE observation on its saved stack. Manual mark (the checkbox) is the other one: it marks the object on the whole-sequence stack and re-runs the pipeline (a new run), for an object below the detection gate. Arming one disarms the other.
The same menu offers Auto centroid, which lets the app pick it again (seeded at the point's current position) and drops the manual mark, opens the Published observations… listing (the run's residuals, the same window as the check block's button), shows or hides the ± (the photometric error), both in the band over the image ("Mag: X ± Y") and in the points table's column, and includes/excludes an observation from the report and the check without touching the measurement. Moving from one observation to the next keeps your histogram level (the stretch), so you do not have to set it again for every stack.
One report from several series
When a project has several runs (for instance a moving object followed across the night), the Combined report section in Analysis puts every measurement in one place: tick the ones you want, press Check together to run one check with all of them against the other observers, and Combined report… to build one MPC report. The verdict names each of your observations with its own residual, so you see which one to drop, and Open in the editor loads them all as one combined set in the editor to work on them there. Untick an observation to leave it out; the selection and the verdict are kept. Re-measures of the same observation (the same frames stacked again) are merged into one, keeping the newest run's.
Clicking a visit in Analysis filters Astrometry runs to that visit, and the visit window lists its own runs: click one to open it in the editor. An undone run has no positions left, so it says so instead of opening a different one.
Your object was confirmed under a new name
An object observed while it was still on the confirmation page (a NEOCP designation) and confirmed since gets a new designation, and its observations move with it. NightScribe finds it on its own and shows it very visibly: the new name and the circular (MPEC) that published it, in the check, on the project's card and in the visit. The card's notice carries a Use the confirmed name link: it renames the project and moves its identity, so the MPC report, the check, the orbit and the ephemeris all use the confirmed designation from then on. The report already uses the confirmed name even before you click that link, so a batch can go out under K26T69G and not the temporary tag. It does this for any project whose object is unconfirmed (the NEOCP flag, or a PCCP kind), whether or not you observed it: a project created by hand is covered too. The lookup is read fresh when it matters: the check and the report always ask the MPC for the current name, so a confirmation that lands while you are working is seen at once. When your station already appears among the published observations it says so: your data is in that circular; when that is not known it links to the object at the MPC instead and claims nothing. If the lookup still comes up empty (the MPC has not published the mapping yet), type the current designation in Check against and press Re-check.
Find_Orb comes with the app
You do not install Find_Orb by hand: it travels inside NightScribe, so the check works out of the box. The optional DE430t ephemerides (public domain, about 95 MB) give the orbit fit finer planetary perturbations; download them from Settings → Measurement → Find_Orb if you want them (they are not bundled). If you already keep your own Find_Orb, point the path field at it and the app uses that copy instead.
The MPC report
Manage MPC report opens the report in its own window: the full submission the MPC expects, with the middle-of-exposure instants, the propagated uncertainties and the magnitude only when there are comparison stars. Every observation goes in; the recommended floor (SNR ≥ 20, settable in Settings) only warns: below it the app says it does not recommend sending that observation, and you decide. Uncheck an observation in the "Measurement per observation" table to leave it out of the report and of the check (the measurement is never deleted, and you can put it back).
Why an SNR floor? Because the MPC archives your measurements forever and uses them for orbits: a point with SNR 8 carries a position uncertainty that spoils everyone else's fit. That is why the app warns instead of sending it silently: the warning is its advice, and the decision to send it is yours.
The report is not just the measurements: it carries the header the MPC requires (your observatory code, the observer, the telescope, the catalogue and the acknowledgement), so the batch is recognized. Fill your details once in Settings → Observatory (name, contact email, telescope type and focal ratio); the app builds the telescope line from them.
Format: ADES XML is the format the MPC prefers, then ADES PSV, then the classic 80-column one. All three carry the header. If in doubt: ADES XML.
The report is editable: fix a designation, a line or the header before sending. What you see is what gets sent; Regenerate rebuilds it from the measurements (discarding your edits). When you have edited it, the send dialog's acknowledgement-text and target fields are disabled, because they only reach the report when it is regenerated.
Copy to clipboard and Save to file… take the report out as it reads.
If you configured Find_Orb in Settings, the app cross-checks your measurements against the orbit it computes itself and shows you the residuals before you submit.
Undo this run removes this execution's observations from the project (the run stays, marked undone, for the audit trail); everything else is untouched.
Sending it to the MPC: the options
Send to MPC… opens the submission dialog. It asks for four things and then sends the batch to the MPC; the server's own answer (the CurlID or the errors) appears in the dialog's log. The dialog opens saying what it is about to send (how many observations, the format, the target and the mode), so the batch never goes out unseen. Without a contact email the send is blocked: the MPC needs it.
Ack. email: where the MPC sends its acknowledgement and any designations. It is the contact email you set in Settings, and you can change it here.
Ack.: a short text the MPC echoes back, so you can tell one batch from another ("Night 1, field B"). Optional.
Target tells the MPC how to route the batch. It is not decoration: a batch whose target keyword is missing or wrong can be misrouted or not processed as you expect. The app puts the keyword in the report's ACK line (80 columns) or in the obj_type field (ADES).
| Target | What it means | When to use it |
|---|---|---|
| Unclassified | The object is already classified (it has a definitive designation): a normal submission. No keyword is needed. | Known asteroids and comets |
| NEOCP | The object is on the confirmation page right now (Near-Earth Object Confirmation Page). The MPC needs the word "NEOCP". | A candidate not yet confirmed |
| PCCP | It is on the Possible Comet Confirmation Page. | A comet candidate |
| NEW NEO | A candidate for a new near-Earth object. | Just discovered, unconfirmed |
| NEW COMET | A candidate for a new comet. | Same |
| NEW NATURAL SATELLITE | A candidate for a new natural satellite. | Same |
| NEW TNO / NEW KBO / NEW DISTANT / NEW CENTAUR | A candidate for a new TNO, KBO, distant object or centaur. | Same |
The default is NEOCP when the project is on the NEOCP and Unclassified otherwise.
Mode decides whether the batch is real or a rehearsal:
Normal: the batch is sent for real; the MPC processes it and publishes it.
Test: it uses the MPC's test endpoint, which runs the same format and validity checks but does not process the batch. It is the rehearsal: use it to check the report is right without committing it.
Further reading
The depth lives in the repository, in the topic documents the app opens from its ?:
docs/ASTROMETRY.md: the centroid, the combination by 1/sigma^2, the error budget and the Find_Orb handoff;docs/MPC_SUBMISSION.md: the ADES and 80-column formats and the submission threshold.
For the words this chapter shares with the rest of the guide (project, visit, run, series, report), see 00. Concepts.
Next: 08. Reporting it.