First steps
Installation
Three paths, depending on how comfortable you are with a terminal:
Installer or package (no Python needed): on the releases page pick the Windows installer
NightScribeSetup-*.exe(or the portableNightScribe-*-windows-x64.zipto run without installing), or on Linux the.deb(Debian, Ubuntu, Mint:sudo apt install ./nightscribe_*_amd64.deb) or the.rpm(Fedora, openSUSE:sudo dnf install ./nightscribe-*.x86_64.rpm), then runnightscribe gui.From the repository (no installer to download, and no package published on PyPI): in a virtual environment,
pip install "nightscribe @ git+https://github.com/irydeo/nightscribe", thennightscribe gui. It needs Python 3.11+ and pulls its own Qt and scientific libraries, so it is a big download, and it brings no bundled Find_Orb (the app looks forfoin~/findorband on yourPATH).From a checkout (if you plan to contribute): clone the repository, create the environment and run
.venv/bin/python -m nightscribe gui.
The detailed, per-system steps are in INSTALL.md.
On Windows, two different gates can stop the installer, and only one has a way through. SmartScreen shows Windows protected your PC and offers More info → Run anyway: click it and the install goes ahead. Smart App Control (Windows 11, on by default on new installations) shows no such option: it blocks the installer outright. It only lets through code signed with a certificate from an authority Windows trusts, and NightScribe is free software with no certificate, so a machine with Smart App Control on will not run it. You can see whether it is on under Windows Security → App & browser control → Smart App Control. If it is, the choice is yours: turn it off, knowing you lose that protection, or run NightScribe on another machine. Nothing else in this guide depends on it.
Either way you need an internet connection: ephemerides and catalogues are downloaded on the fly (and cached locally, so the second query for the same object no longer touches the network).
First run: the Welcome screen
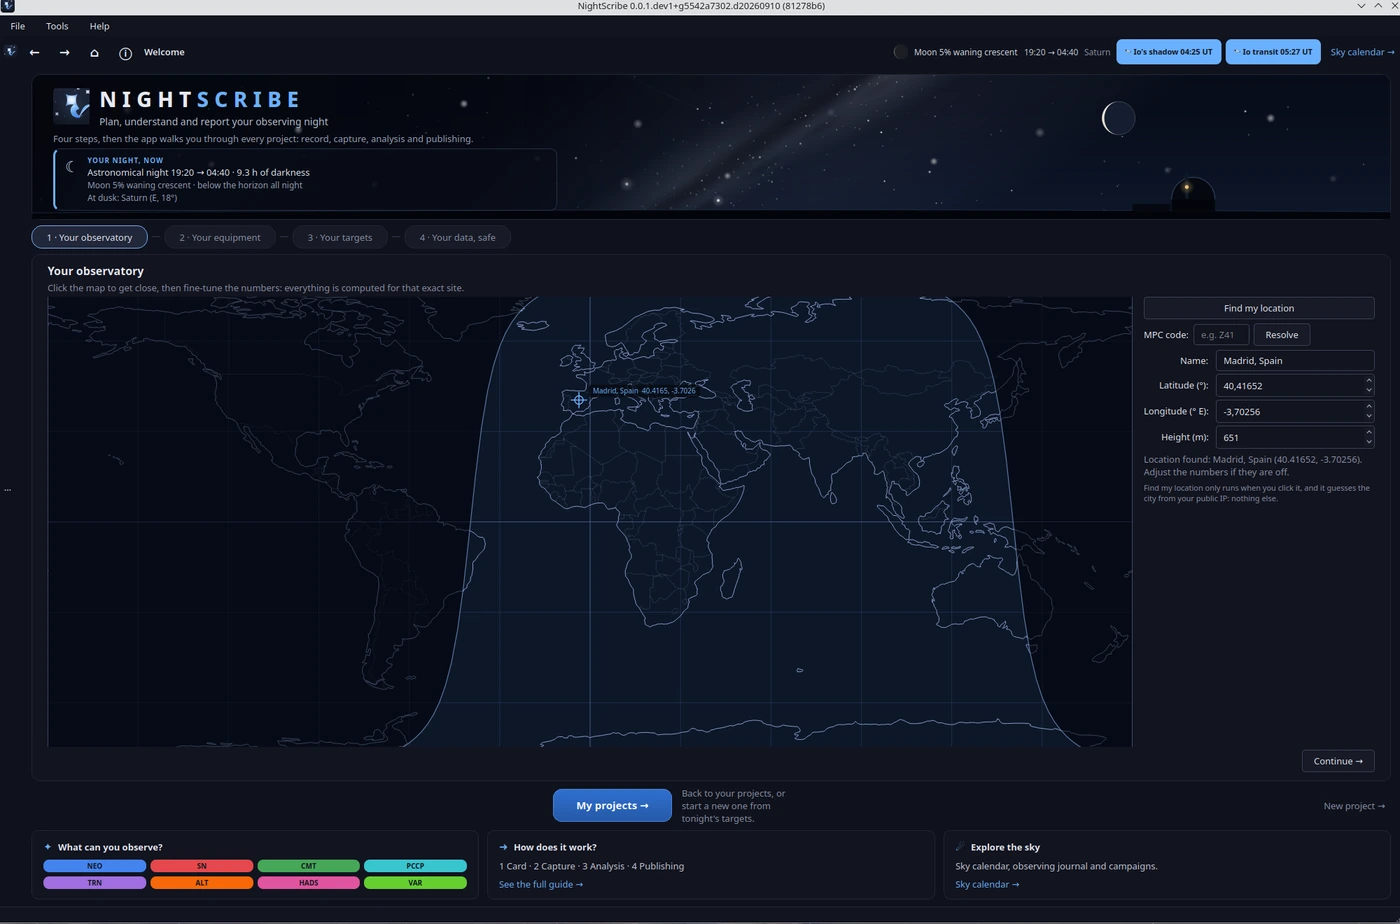
The first time it starts, NightScribe asks you for the minimum it needs to work. Everything you answer here can be changed later under Tools → Settings.
Your observatory
Three ways to tell it where you are; pick one:
Your MPC code (three characters, the ones assigned to your station): the coordinates resolve automatically from the official Minor Planet Center list. This is the most accurate option if you plan to submit astrometry, because it uses exactly the same point the MPC will see in your reports.
"Find my location": resolves your city from your public IP. Fine to get started, but check the coordinates: an IP does not know on which rooftop your telescope sits.
"Pick on the map" or type latitude, longitude and height by hand.
Why so much insistence on coordinates? Everything else derives from them: what is visible tonight, at what altitude, when twilight starts and ends. And in minor-planet astrometry, a 100 m error in your position turns into a measurable error in the asteroid's position, because the topocentric parallax of a nearby NEO can exceed one arcsecond.
Your equipment
Aperture of the telescope and a realistic limiting magnitude for your site: NightScribe uses them to avoid suggesting targets you cannot reach. The limiting magnitude comes pre-filled from the aperture as a starting point; the
injectcommand (chapter 09) measures the real one.Plate scale: camera pixel size and telescope focal length. If your camera is in the preset list, choosing it fills in the pixel size and a starting photometric profile (read noise, full well, working exposure).
Why does the plate scale matter? Pixel size and focal length give the arcseconds per pixel, and from that, how much a NEO moves during an exposure or which photometric aperture fits between two stars. A wrong value breaks nothing, but it degrades the advice.
What you want to follow
One card per target kind (NEOs, comets, supernovae, variables, transits...). Untick what does not interest you: tonight's list will be shorter and more useful. New kinds arriving with an update come enabled, so you do not miss them.
Your data
NightScribe keeps everything (projects, observations, cache) in a local database. On every update it first writes a verified backup and tells you so on this same screen; if something does not add up, you will see it here before anything is touched.
Settings: what you will change eventually
Under Tools → Settings… lives what did not fit in the Welcome. Chapter 10. Settings walks through all of it; here, what is worth an early visit:
Interface language: Spanish, English or system default. Applies on restart.
Camera photometric profile: gain (e⁻/ADU), read noise and linearity. These are the numbers that turn the error bar of your measurements into something honest; the preset provides starting values, but gain and linearity depend on your unit and your gain setting, and NightScribe can measure them from your own frames (chapter 06).
Local horizon: if your observatory has obstacles (buildings, trees, mountains), you can load a horizon file. The planner will stop suggesting targets hiding behind the neighbour's house.
Plate solver: local ASTAP if you have it installed, with nova.astrometry.net as fallback. Needed for astrometry (chapter 07).
Optional integrations: CCDciel or NINA/PINS (capture, chapter 05), and the NEOfixer, Astrometry.net, TNS and AAVSO keys. None is mandatory: without them, the corresponding feature simply stays quiet.
Why does it ask for an AAVSO token? The bright-star vigils (T CrB, R CrB) compare the current state with the photometry the community uploads to the AAVSO, and that API requires identification. Without a token the vigils stay silent; with one, they warn you the day T CrB erupts.
Next: 02. Planning the night.